Places We've Called Home Sign

DIY Duty Station Sign for Military Families

After getting some inspiration for military family crafts last week, we finally got around to making our own version of the duty station plaque that a lot of military families custom order online. We used poplar boards, spray paint, a combination of mdf and stick on letters, and sisal rope to make a Places We've Called Home sign for our entry.

The boards needed two coats of paint and the HOME letters were already black. The top piece was from a 1x4 and each board below from a 1x2.

I chose to make the boards about eight inches wide because I had a narrow space in mind to hang the sign.

Here's a quick look at the steps to creating the sign


Threading the rope through the drilled holes wasn't easy and it's a very snug fit but the small boards can be adjusted up and down without falling so it works well. I used hot glue to attach the HOME letters on the top.


I asked Stephen if he could help me hang the sign from a drawer pull and even though he didn't initially see where I was going with it, in the end we hung the sign from this black pull and I love it.


I hung the sign up to measure the boards' distance from one another and slid them up and down until they were straight and even.


I don't have a vinyl cutter so the easiest option for me was to use some black adhesive lettering.


Placing the letters was a little time consuming but I'm happy with the outcome. When I think that we're done moving maybe we'll replace this sign but for now we can continue to use it and just add more boards to the rope each time we move.

DIY Duty Station Sign for Military Families

The sign filled a tall and narrow space in the gallery wall above our entry table.

Here's one more look at the finished sign.


Yardstick Magnet Board for the Playroom

Our playroom has been a work in progress (and at times a guest room) for our first year here. We've tried to find quick and simple ways to create a bright, colorful, and fun learning area for our three year old son to enjoy and infant daughter to grow into.


Our yardstick magnet center is an example of one of our simple, colorful, learning centers.

We hung a piece of 24x36 sheet metal on the playroom wall. To finish and make child safe the edges, we framed it with yardsticks.


We glued the yardsticks on the metal at first but it was clear that they would be too easy to pull off so they're now attached with screws.

We use a mixture of letter, number, and animal magnets for different activities.


I found this I Love You print to hang above the board and it provides a good guide not only for helping recognize the letters and their right side up, but also with the alphabet sequence.


Instead of leaving the board a mess of magnets, I found a three section storage bin that holds them all.


 We've been practicing sorting the letters, numbers, and animals when it's clean up time.


The bin fits perfectly in one of the cubbies in our playroom storage so it's easy for little hands to practice cleaning up and putting away when he is finished.


All is well when the bins are stored in their cubbies at the end of the day!

Painted Sea Star Art


I've been working on decorating the entryway for a few weeks with some of the frames and wall hangings that have been waiting to be used since I unpacked them a year ago. I couldn't find anything I liked for the empty space below so I made the sea star plaque to fill it in. 


I bought some sisal rope and the unfinished plaque then added leftover drop cloth fabric and one of many random sea stars I had scattered about the house just waiting for a child to break it.


I gave the edges a quick coat of white paint, glued a piece of drop cloth onto the top surface, and hot glued the rope around both the top and bottom edges.

Even though the drop cloth fabric was still drying from spray adhesive and the rope needed some trimming, I knew that it wasn't looking how I wanted it to.


I gave the star a quick coat of black paint. By quick I mean I speed painted it while the Itsy Bitsy Spider played on repeat on my phone to a sleeping but stirring baby in her swing. Once it was dry enough to handle I hot glued the star to the fabric.


I was much happier with the star painted black.


I'm happy with its place in the almost finished gallery wall for now....


Military Family Craft Ideas


We hosted my sister and her family for the last two weeks and now that they've gone back to New York the house seems so quiet with just our two little ones. Moving away from and constantly missing our family is the one aspect of military family life that never gets easier. Right before they left I pinned this pillow to my Military Family Pinterest board as a reminder to myself not to spend too much time missing our last house, last job, or last anything and just be happy in the present.


Here are a few more of my favorite military family pins and projects I hope to start soon!

My favorite project idea so far is this staircase collection of framed house photos from Carmel at Our Fifth House. Maybe it's because we are now in our fifth house, or maybe because the red wall color is amazing, but I can't wait to do this in our house. (I just have to try to figure out exactly what the address of our house in Yemen was.)


My parents live in the same home I was born in and they have a door frame in the kitchen where our heights and now their grandchildren's heights are being measured each year. I pinned this awesome DIY ruler growth chart from That Village House because we move too often to have that.  We can take this with us!


I have plastic storage tubs filled with ticket stubs, street maps, and other memorabilia from our travels and I love this cute way to store them from Kelly at Eclectically Vintage. Storing and organizing them according to year would save me from staring at some reminder I saved and trying to figure out when we were where in the world.


Finally, I like the idea of keeping a pin board like this one from Jamie at C.R.A.F.T. to let the kids map out all of the places they've traveled or want to go.


This print is a pretty reminder to be content in the present moment because even if we miss where we were or can't wait to get where we are going, we're home right now.


Beachfront Baby Water Wrap Review and a Giveaway

Enter for a chance to win one of my favorite pool bag necessities - a Beachfront Baby Water Wrap or Sling!


Trying to prepare for the transition from one child to two, my greatest worry was how I would manage to keep our three year old son happy, busy, and engaged in the activities that we were used to while I had my hands full with an infant. I'm sure that's the case for most parents.

Last summer my son and I spent our days at the neighborhood pool or splash pad. He loves the water and it can get too hot here in Georgia for any other outdoor activities to be comfortable. Staying indoors all day for the whole summer wasn't an option I wanted for my son or my four month old daughter, so I set out to find some way to make the pool or any water babywearing possible with both kids.


I found lightweight, breathable, mesh wraps and slings designed for safe and comfortable babywearing in the water by Beachfront Baby and hoped that one of their water wraps would be the way I made going to the pool work!

I love the fact that Beachfront Baby was created by a mom that, like me, was trying to engage kids of different ages in the same activity rather than decide that a new baby was going to make something impossible! Beachfront Baby founder Diane Turner designed and created her water wrap during a hot Texas summer so she could tend to three children in the water while safely wearing her fourth baby.


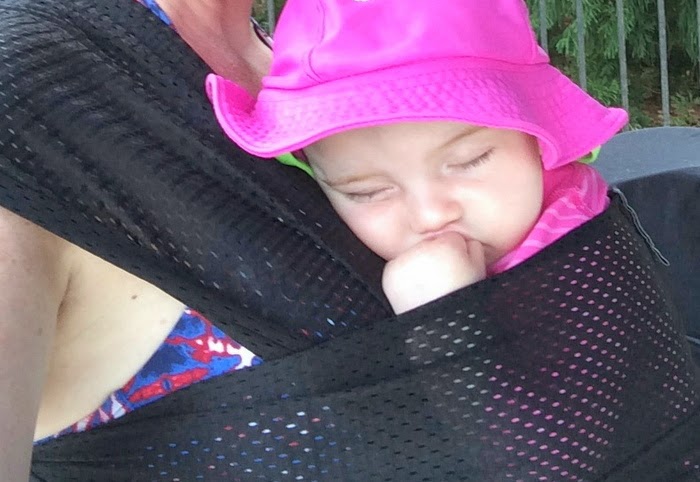
I use a front carrier every day that our four month old daughter loves being in so I chose the one size mesh wrap in black and hoped she'd like it as well. As soon as the wrap arrived, I took a couple of practice tries wrapping it and then put the baby in it in the heart-to-heart hold. Other than using my current carrier, I'm not an expert babywearer and was worried I'd have difficulty with a fabric wrap but it was very simple to get right. The packaging includes instructions that are easy to follow.

With a little adjusting of the fabric, the baby sits comfortably on the crossed fabric beneath her

I wondered how the fabric would stretch and if it would be comfortable and was very happy to find out that the light fabric has just the right amount of give to not pinch the baby's legs while it has enough strength to provide support for my back and shoulders.

(Just one way I know she's comfortable in the wrap!)

I can't say enough good things about this carrier. I've worn it nearly every day since receiving it. I can be in the pool with both kids and have the ability to support my son if he needs help or just wants me to play with him. My wrap allows me to be hands free without any issue or compromising either child's safety in and around the water.


I can't wait to use my wrap at the beach and the splash pad, places that my son loves that didn't seem manageable before I got it. I'll also use this wrap outside of the water for a cooler, lighter weight babywearing option but we've been at the pool every day since I got it!

Now, on to the giveaway.... Beachfront Baby is giving one lucky reader any wrap or sling from their website in the color and size of their choice. On top of that, all readers can take 10% off any purchase for the month of July. Just enter the code "EITS SUMMER" at checkout.

To enter the giveaway, follow the instructions on the widget below.


Good luck!


**This giveaway is sponsored by Beachfront Baby. All opinions are my own and I received no compensation for this review**

Giveaway Rules: 

No Purchase necessary. To enter, participants must use the Rafflecopter widget above. The giveaway is not affiliated, administered, or endorsed by Pinterest, Instagram, or Facebook. The giveaway closes on July 14 at midnight and the winner will be notified via email. The winner must be 18 years of age or older and a U.S. resident in order to win. Prize is valued up to $60. 

Great Smoky Mountains Chuggington Adventure


This weekend we took our first road trip since Aven was born. We got lucky and she didn't cry for much of the three hour trip to Bryson City, NC.  We've tried to stay close to home with her to avoid stressful car rides but when I found out that the Great Smoky Mountains Railroad was hosting a Chuggington Train adventure, I knew that we were going!


We rented a house for the weekend and spent most of our time sitting on the tree top deck. It was covered and had a ceiling fan so when it rained we were happy to sit and relax out there and the fan kept any bugs away.


We were just a short drive away from the train depot in Bryson City.


The weather cooperated long enough for our Chuggington adventure and we all had a great time riding on the train, meeting the Chuggington trains, and taking part in the adventure games.


The train ride took us to an adventure area that had tents with different Chuggington challenges set up for the kids. There was also a roundhouse that my little one couldn't resist trying to take a peek into. I can't blame him though because I was almost as excited as he was at his chance to experience meeting his favorite characters.


It was such a great weekend and we really needed to get away. It won't be easy to forget the look on his face when he saw the trains come out to meet everyone.


Related Posts Plugin for WordPress, Blogger...