Showing posts with label DIY. Show all posts

Making Base Housing Feel Like Home: Small Bathroom Decor Ideas


nauticalbathroommakeover

Anyone who lives in military base housing knows all too well how challenging it is to create a space that feels like home when painting or major DIY renovation projects aren't always an option. Even the smallest changes or DIY project is done with the knowledge that time in base housing is temporary and any change made will have to be changed back when we move out! This usually results in living with things we don't necessarily like about our house.


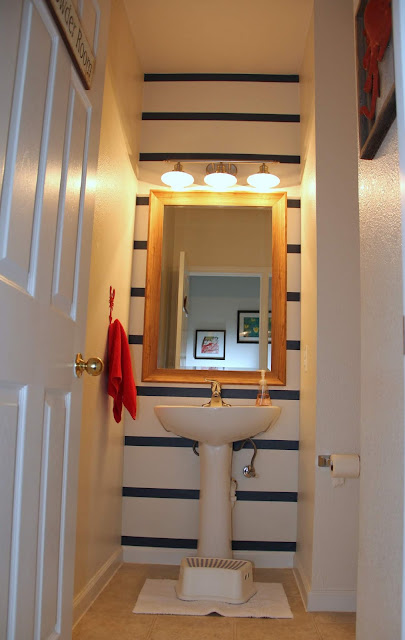
When we moved into our home on base, I knew the small downstairs powder room was going to be a challenging space to brighten up because of its size and shape. The room is narrow and deep in a hallway with little natural light; so it is usually dark. Like the rest of our house, the walls are bright white and textured so any DIY bathroom decor ideas needed to include color to brighten the space. We knew we would be moving and because it's on-base housing any bathroom vanity makeover needed to be temporary, removable, and inexpensive. For just a bit more than $100 and without paint, the small powder room was transformed using materials that could move with us to our next home.

Here is the bathroom when we moved into the house. The room felt cold, sterile, and dark despite the bright white walls.

small bathroom before


Because so many details bothered me, including the face-height towel bar nowhere near the sink, it was hard to decide where to begin. The 3-bulb vanity light was not very pretty and the sink itself had no storage or way to conceal the plumbing attachments. My main goal was to prevent that from being the first thing people would see looking into the room!

Vanity before photo


A serendipitous online clearance sale on rolls of blue vinyl stripes that perfectly fit the bathroom vanity wall width made the decision to create a striped accent wall an easy one. I love a red, white, and blue combination for a nautical-looking room; especially in a small one like a powder room.

I purchased two rolls of 10 pre-cut navy blue vinyl stripes for $28 for the accent wall.  I ended up using eleven stripes for the accent wall and although I was worried that it might be difficult for the vinyl stripes to adhere to a heavily textured wall, they stayed in place perfectly.

vinylstripeswall


I found a wood look mirror at Homegoods for $32 and knew it would fill the area over the sink much better than the flat, boring mirror that was there and hold up to splashes or cleaning. We hung the new mirror right over the top of the old one so we didn't even have to worry about re-hanging it when we move. When I found a clearance three light vanity light with metal shades for $40 at Home Depot, the vanity area came together exactly how I wanted it to!

I shopped the rest of my house for the accessories we used. The blue whale was sitting in our toy closet.

bathroomart

By itself, it seemed out of place on the white wall but after adding metal hooks, rope, and a burlap ribbon, it fits perfectly next to the wood toned mirror over the sink.

nauticalbathroomart


After hanging the whale, the red lobster towel hook and red metal octopus joined in and basically turned the blue and white bathroom makeover into a red, white, and blue color scheme with a nautical/ocean theme I hadn't really planned but went with anyway.

Red bathroom accents

I added one of our red gas station number signs and moved the toilet paper holder back into the nook where the toilet is because it made better sense to have it there (base housing) and so it wasn't one of the first things you see looking into the room.

Bathroomaccessories


The red octopus looked strange to me on its own, like the whale did before adding rope and ribbon to it, so I used an old reclaimed wood frame to give it more of a space of its own.

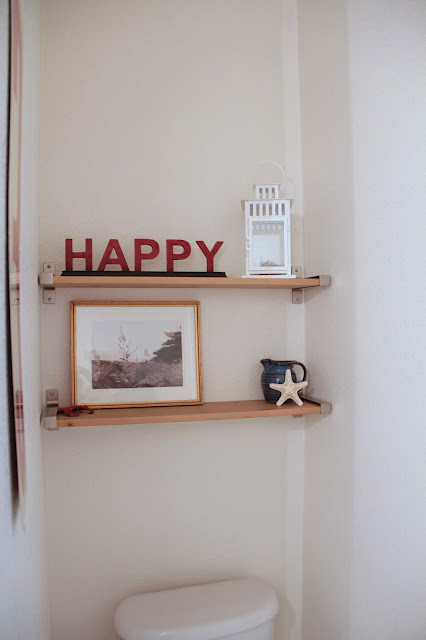
The last things I added to the bathroom makeover were two $18 Ikea shelves that matched the same wood color of the vanity mirror and with metal brackets similar in look to the metal vanity light. The two shelves sit over the toilet and help break up the tall, plain, bright white wall.

bathroom shelves

I added a tall vase soon after installing the shelves and took away the happy sign which made even more of a difference in how stark and bland the wall looked back there in the little cave-like area where the toilet is.

For just over $100, our small base housing bathroom was transformed with a vinyl stripes accent wall, new mirror, new vanity light, and two floating shelves. Colorful wall hangings that we had on hand finished brightening up the stark, all-white bathroom. Even though it's not usually possible to make permanent or expensive changes to military base housing, try small changes like these to make your base housing feel like home!

NauticalBathroomMakeoveronBase

Making Base Housing Feel Like Home: Kids' Rooms

     I wasn't sure how living in base housing was going to be and worried about how I would make everything we own fit, how I'd make it feel like home without being able to change things that bothered me, and how I would be able to stand a completely white interior. Every single wall, ceiling, door, and inch of trim in this house is white. It's not that we couldn't paint if we wanted- we didn't want to. Who wants to paint a house only to have to return it to white in what could be less than a year's time? Instead, I slowly learned to like the way that most of our things work on a white wall. Today I'm sharing some photos of our son's room.

Kids Room Gallery Wall in Base Housing

     Since we are getting ready to move again, I'm trying to take photos of my favorite spaces in this house so that I'll be able to help the kids remember what we call the "Blue House."
Out of all of the white walls in this house, their walls were the easiest to brighten up. The kids' rooms were the first to feel like 'home' and even if they don't always remember these details, I'll be able to show them the photos.


Colorful Gallery Wall in a Kids Room

     Our son turned five not long after we moved here and his room is playful and full of bright colors. This little book wall is my favorite part of the room and turned what was a small, white, empty box feeling room into a space that feels happy as soon as you walk inside.


     The Noah's Ark mobile has hung in all of his rooms since he was born and even though he's outgrowing having a mobile in his room I plan to hang it in one more!


Colorful Decor for Base Housing in Kids Rooms

     The gas station number sign for his age and some of his own artwork combine with whatever objects come and go from the shelf. Our neighbor made him the lightning bolt and I painted it yellow.


Colorful Wall in Base Housing

The best part about finding ways to add color to base housing without painting- as we get ready for another move- is that all of these things are coming with us! I'll share some pictures of our daughter's room next time.

Heart Art for the Nursery


\Pink and red nursey decor


When I saw a hot pink animal print heart on clearance at 90% off I knew I could turn it into something a little less wild that would fit perfectly with the pinks and reds in the baby's room. 


Even though we'll probably move again before it's finished, I've been trying to decorate her nursery with homemade artwork and crafts. I made this canvas sign:


I loved this trim so much and knew I was going to use some bright pink eyelet trim that I found on sale a while ago. Because the center of the cheetah heart is raised, it provided a nice border all around it to fasten the eyelet trim to.


The first step was to cover the wild print and I used several coats of white paint to do it. The finish wasn't perfect but I wasn't expecting it to be after rescuing this piece from the cluttered clearance section.

I glued the fabric trim around the center heart and tried to trim the pieces in a way that made them fit together. 


I really didn't love the look with the heart painted white so I mixed some fuscia, red, and pink paints and colored the inside of the eyelet trim area.

I painted a small letter A red for the center of the heart for my daughter's first initial and covered it with tiny paper polka dots before varnishing it for shine.


I really like the bright happy look of the red and pink combination in her room!


How to Use Engineering Prints to Decorate at a Party


One of my favorite decorating touches at our daughter's first birthday party was the photo collage I made with engineering prints and poster board. Just as I did with my son, I took photos of her every month of her first year wearing numbered onesie stickers. 


At my son's first birthday party, I hung a banner with his photos from each month. 


I knew that I wanted to do something similar for her party. Instead of a banner, I made a collage of the 12 photos with PicMonkey and then had a large engineering print of the collage made.


Here is the engineering print of the photo collage on black poster board and on the wall. I used felt roses for some extra pops of red and to disguise the tacks that I hung the board with.


I loved the way it turned out so much, the was process so simple, and the cost so low, that I decided to choose several of my favorite photos of her from birth to a year and make prints of them to use at the party as well.


A lot of people have asked me how and where I made the prints for the photo wall so I'm going to show you how I did it.

I used Staples and was really happy with the quality and how fast they were done but you can do it at other copy/print/mail centers as well. Follow these instructions if you want to do it using the Staples website.

When you get to the Staples Copy & Print online store, click on 'Oversized Prints'


I selected 'Engineering Prints in B/W'


You'll need to click on Media (Blueprints...) to select the size you want. I chose the 18X24 size. Check the box at the bottom that says 'Fit content to Paper'


Click on 'Add Files' in the upper left corner and select a photo from your computer or disk that you want to print. This is the photo that I used to make a poster for the mantel.


After previewing your photo, just add to your cart and order! All of mine were ready for me to pick them up within an hour. 

For the wall collage I used a combination of washi tape, heart clothespins, and clear tacks to affix my prints to poster boards. Because the paper for the prints is so thin, you might not want to use any kind of adhesive that could bleed through the paper and stain the photo. I hung the prints with a LOVE sign that I made out of leftover paneling and vinyl lettering and it made for such a sweet Valentine's Day first birthday photo wall.


The engineering prints are perfect for a party decoration or something like a word art print but are not meant for high resolution photo printing. Photo canvases are still my favorite way to display my pictures.

That said, I'm going to order one of these engineering prints before purchasing photo canvases in the future. Because it's difficult to visualize how a photo will look when it's really large, this is a perfect way to determine what will look good before paying big bucks for the canvas that can't be returned.

DIY Valentine's Day Craft : Hearts Tree


Taking down all of the Christmas red is always a little sad and can make the house seem as cold as the air outside. While I was shopping the after Christmas sales this year, I kept finding red decorations that would be just as cute for Valentine's Day. Because I'm planning a Valentine's Day first birthday party, I've started to get the house ready and I'm loving having bright red all over the house again. So if the house is feeling a little blah after taking down the Christmas glitz, just do what I'm doing and throw some hearts all over it!


Valentine's Day Hearts Tree

I used red felt hearts to trim the same white spray painted branch I use all of the time and instantly brightened and warmed up the foyer. Love it. I'm still deciding whether to keep it in the entry or use somewhere else at the party so more pictures to follow!

One of the best bargains I found after Christmas was a stack of wild looking sparkly floral accents. They were 90% off because they were a holiday item so each stem was about 30 cents. Even if they end up being a tad sparkly at Christmas, for a Valentine's Day party centerpiece or mantel, I love them.


Valentine's Day Branches

I'm having so much fun planning a Valentine's Day party as crazy and a little sad as it is to me how fast this first birthday has arrived. There are a lot of hearts flying around here and I'm loving it.


Heart of Gold Ornament


Even though I doubt there's a gift teachers like to receive more than a gift card, I wanted to make something to include with it for our son's teachers.


I used a sparkly sequined paper to cover an mdf heart and created a shiny ornament with a message on the back that we appreciate their heart of gold.


To keep the paper from tearing and to keep the tiny little bits of sequins from falling off, I coated the heart with sealer before threading the rope back through.


I wrote a message on the back with a gold marker.


I might use the ornament as a gift tag on the gift card box. I think it would also be really cute to make a gold star for a teacher gift!


Trash to Treat: Candy Corn Pumpkin Stands


Candy Corn Pumpkin Stands

Anyone who knows me knows how much I love candy. Halloween is a tempting time for me because it ends up being such an all out treat fest. I decided this year that I wasn't buying candy for trick or treaters until the morning of Halloween because if it's in the house, I'm eating it.

So it's no surprise that when I looked at this black Ikea FNISS trash can, I saw an upside candy corn. Can you see it?


Trash bin upside down plus orange, white, and yellow paint, equals candy corn!

Candy Corn Pumpkin Stand


The trash cans were already being used for plant stands so my candy obsession is only partially to blame. Over the summer I bought two for $1.49 each and used them as stands for ferns on either side of the front door. They're just the right height for our entry and much cheaper than any other planter or stand available.


Trash Can Candy Corn Pumpkin Stand

I knew they could double as pumpkin stands for our carved jack-o-lanterns and again as stands for our fall mums.


Because the can is a series of rings that act as a guide, painting the three sections was easy and I rolled it on without taping. 

Front Door Candy Corn Decorations


I'm already planning my red and white striped candy cane Christmas tree bases!


Striped Skeleton Halloween Wreath: Using Spray Paint on Styrofoam

Spray Painted Styrofoam Orange and Black Striped Halloween Wreath With Skeletons and Bats


Over the summer I bought a styrofoam ring to make a life preserver style wreath for the door but just never got around to it so after a coat of orange spray paint it was ready to use for Halloween.

Last year I had a wooden skeleton hanging on our door but it blew around in the wind and banged into the door so loudly that there's no way it was going back on there this year.  I decided a 'quiet' wreath out of styrofoam would be better. Black and orange spray paint with polka dots can be considered quiet, right?

Spray Painted Styrofoam Orange and Black Striped Halloween Wreath With Skeletons and Bats

After the coat of orange spray paint dried, I taped off stripes. When I had them lined up how I wanted, I went around and really pressed the tape edges down because I thought there might be a lot of bleed through with painted foam.

Spray Painted Styrofoam Orange and Black Striped Halloween Wreath With Skeletons and Bats

Here's the painted wreath. It looked like Tigger! (Anyone need an idea for a Tigger party?)
To finish the painted wreath I went through my stash of Halloween gear and found skeletons and bats.

Because they open down the middle and never seemed practical as boxes that would hold anything I decided to split these cardboard skeleton boxes and use them for accents on the wreath. I covered them with a couple of coats of black spray paint.

Spray Painted Styrofoam Orange and Black Striped Halloween Wreath With Skeletons and Bats

I topped the wreath with a paper bat and tied a polka dot ribbon on the bottom.

Spray Painted Styrofoam Orange and Black Striped Halloween Wreath With Skeletons and Bats

Corsage pins served double duty and both fasten my spooky flare onto the wreath and give the bat and skeletons eyes to glare at the trick-or-treaters coming to the door.

Spray Painted Styrofoam Orange and Black Striped Halloween Wreath With Skeletons and Bats

Now I'm ready to start the rest of our Halloween crafting and decorating!

Spray Painted Styrofoam Orange and Black Striped Halloween Wreath With Skeletons and Bats


Related Posts Plugin for WordPress, Blogger...